前言
看完 CountDownLatch 正准备表示一番,突然看到了一个 CyclicBarrier —— 回环屏障。沃特?回环还屏障?说比 CountDownLatch 要多一个回环,那咱可得瞧一瞧,看一看了!
介绍
一个同步辅助,它允许一组线程的所有等待彼此达成共同屏障点。
CyclicBarrier 在涉及固定线程数且必须等待彼此的程序非常有用。
该屏障被称为回环屏障 ,因为它在等待的线程被释放后可以被重新利用。
CyclicBarrier 支持一个可选的 Runnable 命令,该命令在障碍中的最后一个线程到达之后,但在释放任何线程之前,每个屏障点运行一次。
此屏障操作对于在任何一方继续之前更新共享状态很有用。
通过上面的源码注释基本可以得出以下结论:
- CyclicBarrier 和 CountDownLatch 类似,但它是一组线程等待,直到在其他线程中执行的一组操作完成为止。
- CountDownLatch 是计数递减,结束后再调用 await 或者 countdown 都会立即返回,但是 CyclicBarrier 可以重置屏障。
- CyclicBarrier 还可以传入参数 Runnable ,Runnable 会在释放线程之前执行。
基本使用
既然上面总结了三个结论,下面当然从三个方面演示如何使用的:
- 屏障功能
1
2
3
4
5
6
7
8
9
10
11
12
13
14
15
16
17
18
19
20
21
22
23
24
25
26
27
28
29
30
31
32
33
34
35
36
37
38
| public class CyclicBarrierTest {
private static final CyclicBarrier CYCLIC_BARRIER = new CyclicBarrier(11);
public static void main(String[] args) throws BrokenBarrierException, InterruptedException {
ExecutorService pool = new ThreadPoolExecutor(10, 10, 0L, TimeUnit.MILLISECONDS,
new LinkedBlockingQueue<>(1024),
new ThreadFactoryBuilder().setNameFormat("Thread-pool-%d").build(),
new ThreadPoolExecutor.AbortPolicy());
for (int i = 0; i < 10; i++) {
pool.submit(() -> {
try {
System.out.println(Thread.currentThread().getName() + " 开始执行");
Thread.sleep(5000);
System.out.println(Thread.currentThread().getName() + " 执行结束,准备调用 await");
CYCLIC_BARRIER.await();
} catch (InterruptedException | BrokenBarrierException e) {
e.printStackTrace();
}
});
}
System.out.println("主线程执行 —————————————— >>>");
CYCLIC_BARRIER.await();
System.out.println("主线程继续执行 —————————————— >>>");
pool.shutdown();
}
}
|
通过上面代码其实模拟了个类似 CountDownLatch 的功能,让所有线程等待,直到都调用 await 之后,各个线程继续执行,同时主线程也继续往下执行。
不过相对 CountDownLatch 的指定一个线程或多个等待,直到其他线程执行结束,等待的线程才继续执行来说,CyclicBarrier 相对来说还是逊色。
差别总结如下:
- CountDownLatch 是指定等待的线程,其他线程进行 countDown,等计数为 0 时,等待的线程继续执行。
- CyclicBarrier 是一组线程调用 await 进行等待,当所有的都进入等待的时候,这一组就会一起冲破屏障继续执行。
- 回环功能
1
2
3
4
5
6
7
8
9
10
11
12
13
14
15
16
17
18
19
20
21
22
23
24
25
26
27
28
29
30
31
32
33
34
35
| public class CyclicBarrierTest2 {
private static final CyclicBarrier CYCLIC_BARRIER = new CyclicBarrier(5);
public static void main(String[] args) throws BrokenBarrierException, InterruptedException {
ExecutorService pool = new ThreadPoolExecutor(5, 5, 0L, TimeUnit.MILLISECONDS,
new LinkedBlockingQueue<>(1024),
new ThreadFactoryBuilder().setNameFormat("Thread-pool-%d").build(),
new ThreadPoolExecutor.AbortPolicy());
for (int i = 0; i < 5; i++) {
pool.submit(() -> {
try {
System.out.println(Thread.currentThread().getName() + " 开始执行");
CYCLIC_BARRIER.await();
System.out.println(Thread.currentThread().getName() + " 冲破屏障 >>> 1");
CYCLIC_BARRIER.await();
System.out.println(Thread.currentThread().getName() + " 冲破屏障 >>>>> 2");
CYCLIC_BARRIER.await();
} catch (InterruptedException | BrokenBarrierException e) {
e.printStackTrace();
}
});
}
pool.shutdown();
}
}
|

上面演示的回环的用法。
- 回环 Runnable
这块只需要在声明的 CyclicBarrier 修改为以下即可:
1
2
3
4
5
6
| private static final CyclicBarrier CYCLIC_BARRIER = new CyclicBarrier(5, new Runnable() {
@Override
public void run() {
System.out.println("执行一次 Runnable ");
}
});
|
打印结果如下:

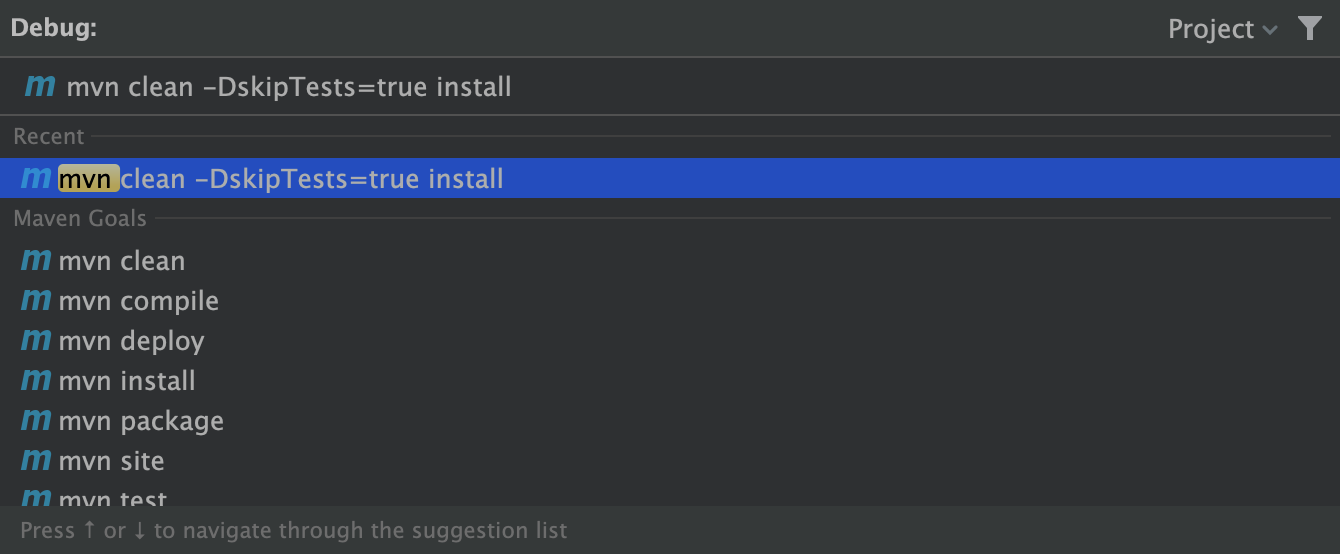
可以看出只是在下一个计数开始之前,先执行 Runnable 。至于是不是在释放屏障之前,那很容易,直接 Debug 走一遭就知道了!专门录制了个视频:

通过 debug 可以看出Runnable 会在释放线程之前执行。
问题疑问?
- CyclicBarrier 和 AQS 有什么关系?
- CyclicBarrier 的实现原理是什么?
- CyclicBarrier 是如何实现回环的?
下面就带着疑问去源码阅读,一探究竟!
源码分析
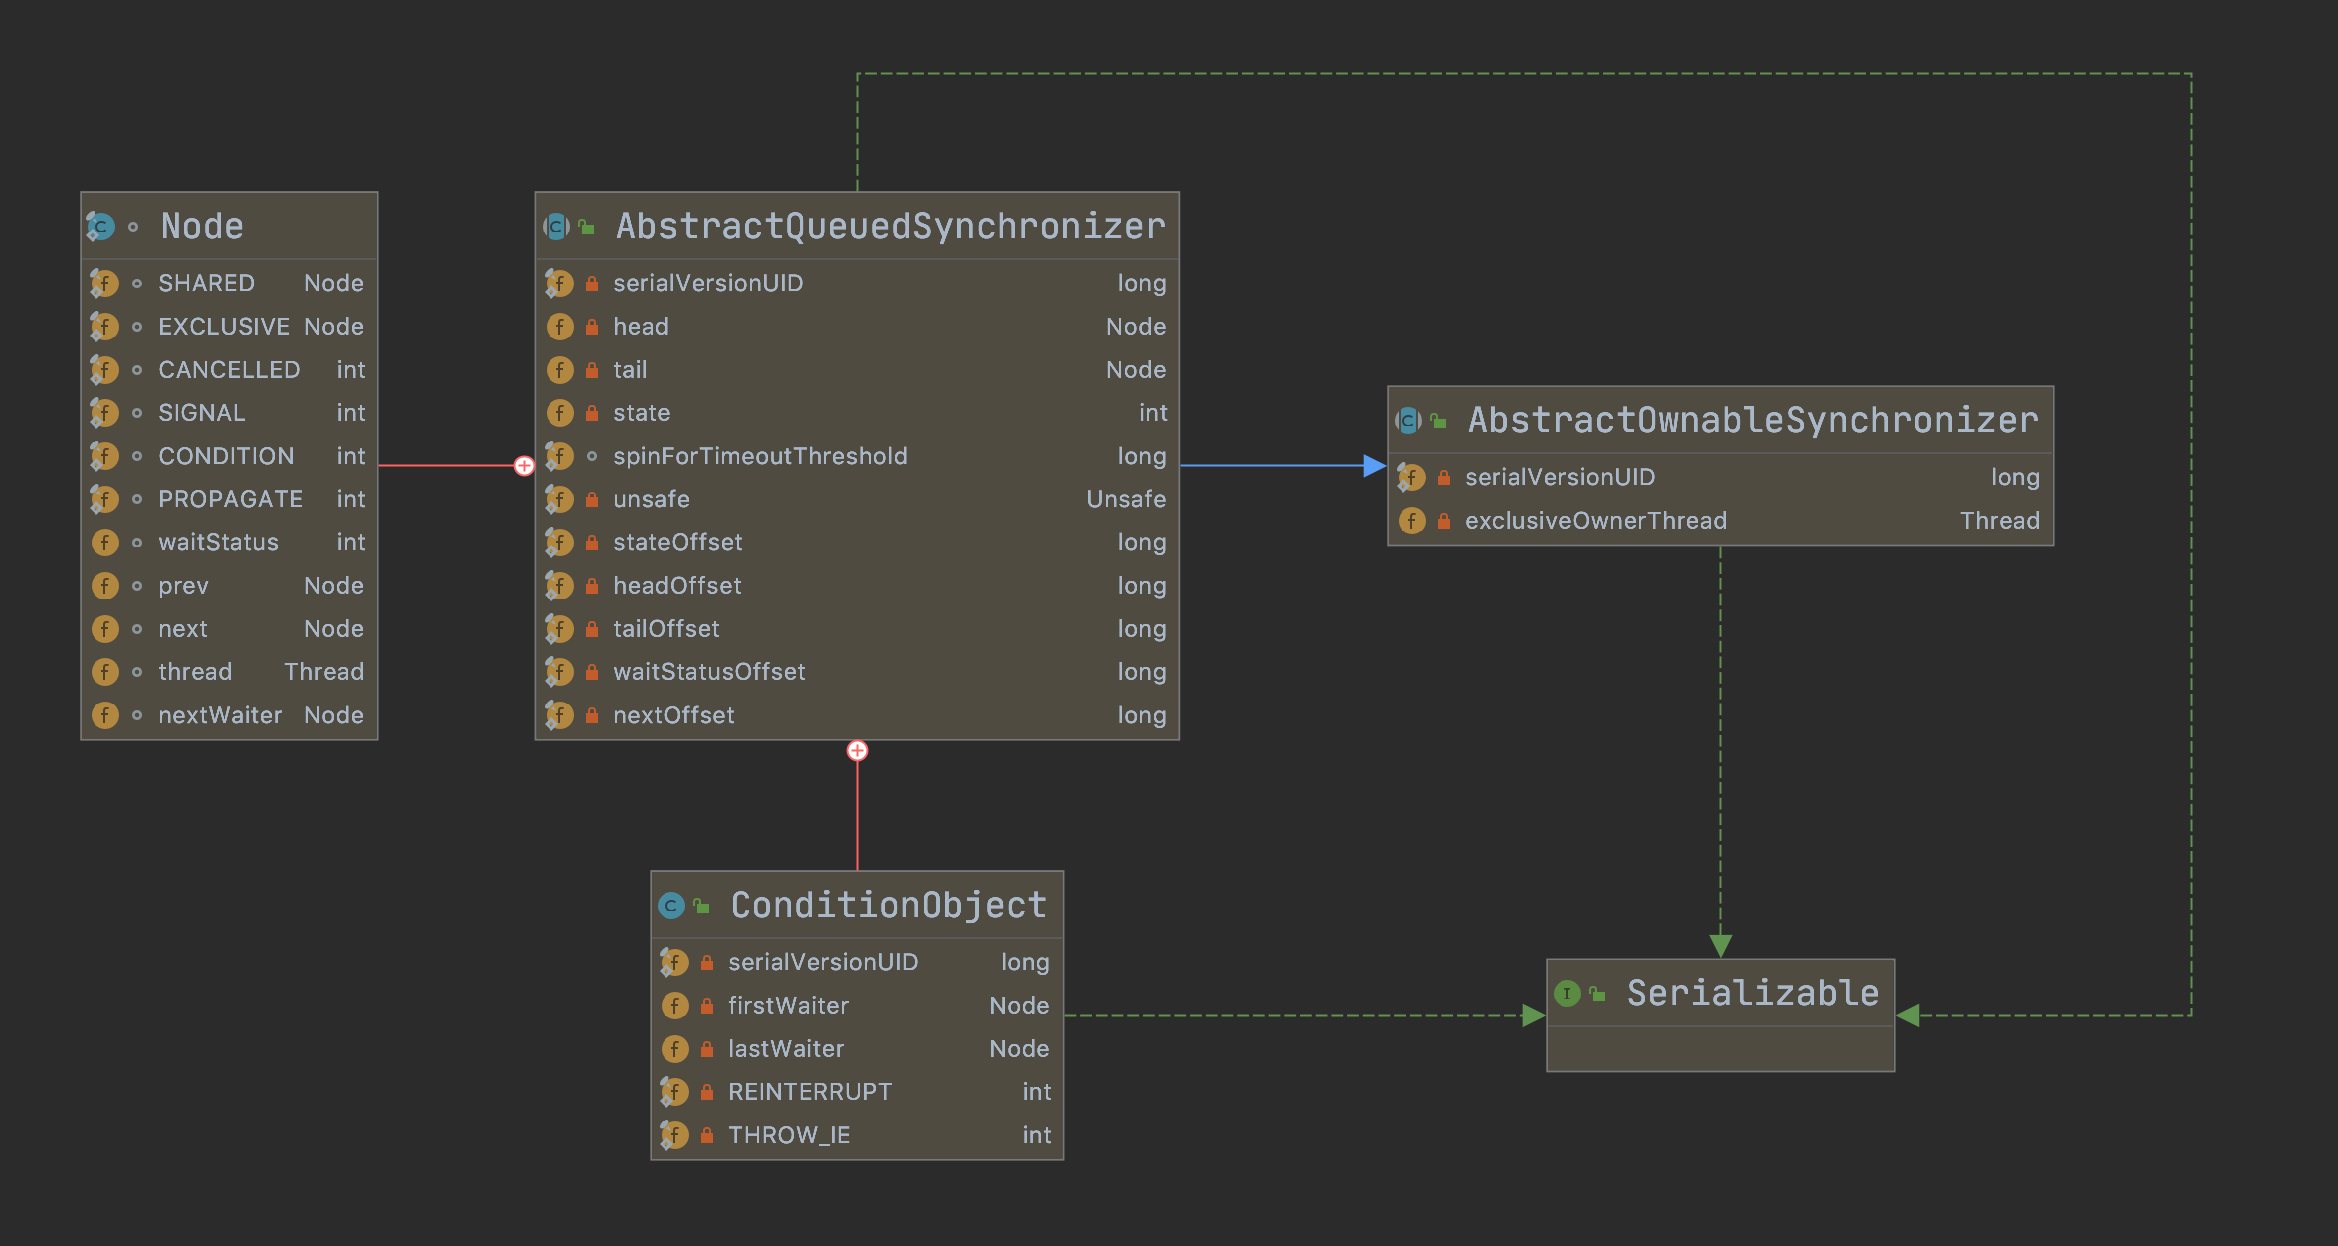
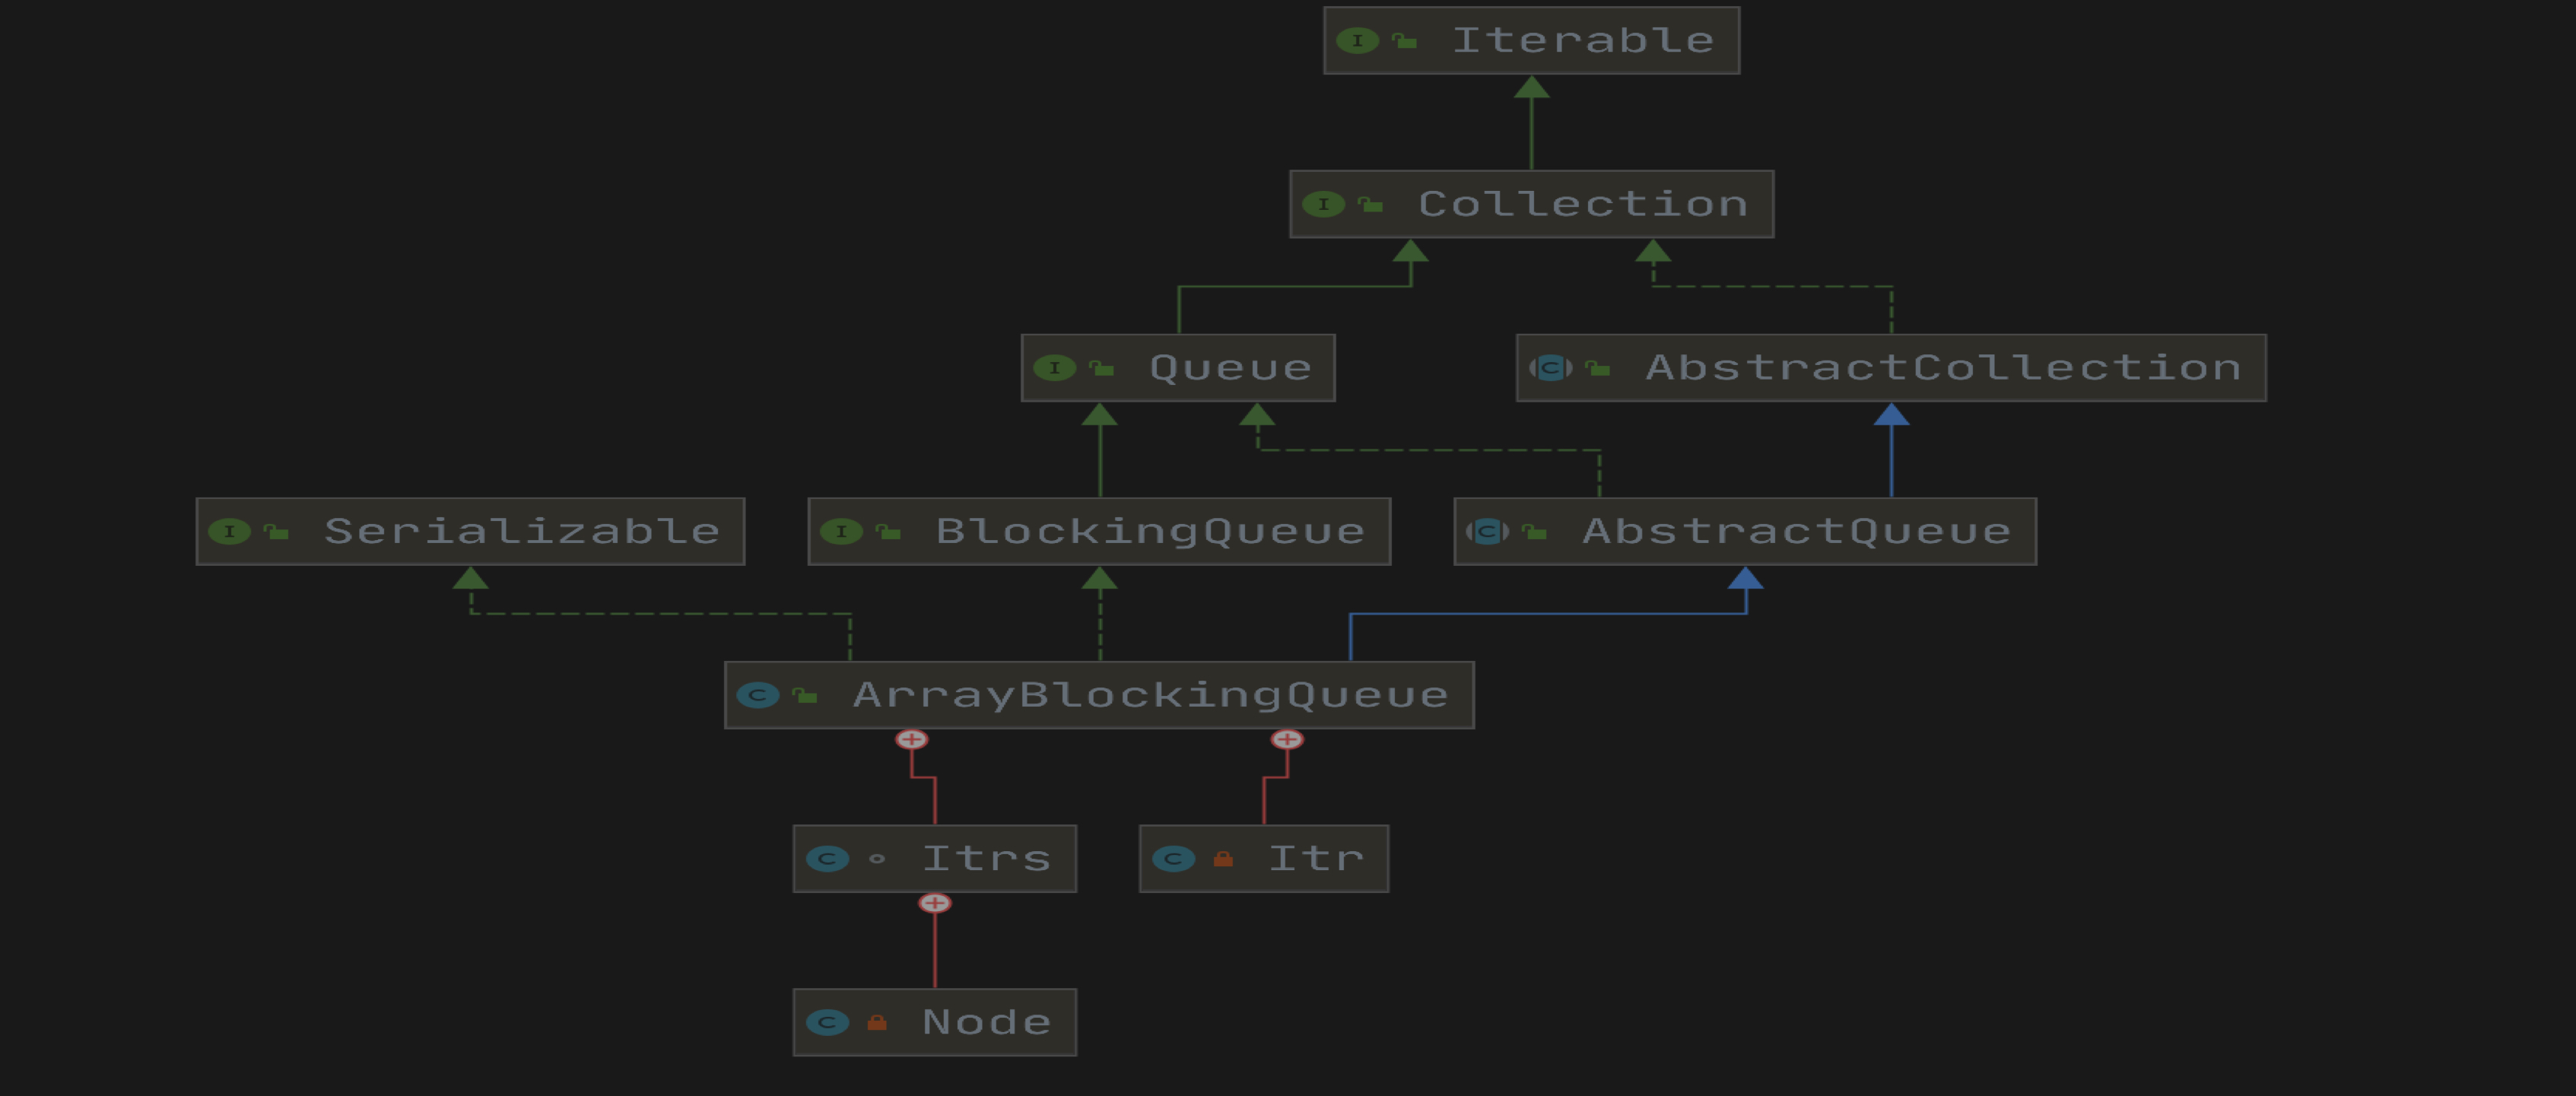
基本结构

通过 UML 乍一看,CyclicBarrier 和 AQS 并无什么关系,那下面开始从参数、构造器、await()方法分别看源码。
参数
1
2
3
4
5
6
7
8
9
10
11
12
13
14
15
16
17
18
19
20
21
22
23
24
| public class CyclicBarrier {
private static class Generation {
boolean broken = false;
}
private final ReentrantLock lock = new ReentrantLock();
private final Condition trip = lock.newCondition();
private final int parties;
private final Runnable barrierCommand;
private Generation generation = new Generation();
private int count;
}
|
通过上面可以看出:
内部使用了一个静态类 Generation ,它有什么功能呢?通过注释了解到,每次使用屏障的时候都会生成,具体有什么用,其实就是用来标示屏障是否被打破。
内部还有一个 parties 表示等待计数,count 表示仍在等待的计数。
那就继续往下看吧!
构造器
1
2
3
4
5
6
| public CyclicBarrier(int parties, Runnable barrierAction) {
if (parties <= 0) throw new IllegalArgumentException();
this.parties = parties;
this.count = parties;
this.barrierCommand = barrierAction;
}
|
这里的入参有两个:
- parties(等待计数):记录多少个线程调用 await 之后,才会一起打破屏障。
- barrierAction:冲破屏障前执行的行为。
- 但是会同时对 parties 和 count 赋值为传入的 parties。
单参数构造,其实就是将 barrierAction 赋值为 null。
await() 方法
在示例中用的 await() 方法, 那就从 await() 方法入手:
1
2
3
4
5
6
7
| public int await() throws InterruptedException, BrokenBarrierException {
try {
return dowait(false, 0L);
} catch (TimeoutException toe) {
throw new Error(toe);
}
}
|
await() 才是重头戏, 先来根据源码注释,了解是干嘛的,看看作者怎么讲:
- 等到所有各方都在此障碍上调用await。
- 如果当前线程不是最后到达的线程,则出于线程调度目的将其禁用,并使其处于休眠状态,直到发生以下情况之一:
- 最后一个线程到达;
- 其他一些线程中断当前线程;
- 其他一些线程中断其他正在等待的线程之一;
- 等待屏障的时候其他线程超时;
- 其他一些线程在此屏障上调用 reset。
看到这些,咱们最想看的当然是 2.1 ,等待最后一个线程到达屏障,之后所有的线程一起继续执行。
1
2
3
4
5
6
7
8
9
10
11
12
13
14
15
16
17
18
19
20
21
22
23
24
25
26
27
28
29
30
31
32
33
34
35
36
37
38
39
40
41
42
43
44
45
46
47
48
49
50
51
52
53
54
55
56
57
58
59
60
61
62
63
64
65
66
67
68
69
70
71
72
73
74
75
76
77
|
private int dowait(boolean timed, long nanos)
throws InterruptedException, BrokenBarrierException,
TimeoutException {
final ReentrantLock lock = this.lock;
lock.lock();
try {
final Generation g = generation;
if (g.broken)
throw new BrokenBarrierException();
if (Thread.interrupted()) {
breakBarrier();
throw new InterruptedException();
}
int index = --count;
if (index == 0) {
boolean ranAction = false;
try {
final Runnable command = barrierCommand;
if (command != null)
command.run();
ranAction = true;
nextGeneration();
return 0;
} finally {
if (!ranAction)
breakBarrier();
}
}
for (;;) {
try {
if (!timed)
trip.await();
else if (nanos > 0L)
nanos = trip.awaitNanos(nanos);
} catch (InterruptedException ie) {
if (g == generation && ! g.broken) {
breakBarrier();
throw ie;
} else {
Thread.currentThread().interrupt();
}
}
if (g.broken)
throw new BrokenBarrierException();
if (g != generation)
return index;
if (timed && nanos <= 0L) {
breakBarrier();
throw new TimeoutException();
}
}
} finally {
lock.unlock();
}
}
|
这一大坨代码,完全没有看的欲望,直接划过去吧!
所以…… 直接看到了这里吧。
代码还是要阅读的,分开来看(异常流程省略):
- 使用了 ReentrantLock 互斥锁,因此对 count、broken 的修改是原子性的。
- 对 count 进行 –count 操作,这样就理解为什么说 count 是仍在等待的计数,或者说还有多少才能到达屏障点。
- 当 count 为 0 ,表示到达屏障点了

- command 不为 null,会先执行 **command.run()**, 值得注意的是这里并不是新开了个线程。
- **nextGeneration()**开始新的下一代,即重置 count 为 parties。
- 在 finally 里面使用 breakBarrier() 打破屏障。
- 当 count 不是 0
- 自旋,直到是 0.
这后面还有两个方法不能少:
1
2
3
4
5
6
7
8
| private void nextGeneration() {
trip.signalAll();
count = parties;
generation = new Generation();
}
|
1
2
3
4
5
6
|
private void breakBarrier() {
generation.broken = true;
count = parties;
trip.signalAll();
}
|
reset()
1
2
3
4
5
6
7
8
9
10
11
|
public void reset() {
final ReentrantLock lock = this.lock;
lock.lock();
try {
breakBarrier();
nextGeneration();
} finally {
lock.unlock();
}
}
|
将屏障重置为其初始状态,reset() 方法其实还是调用的 breakBarrier() 和 nextGeneration(),前者时打破当前代,后者是开始新的一轮。
总结
Q: CyclicBarrier 和 AQS 有什么关系?
A: 通过阅读源码,其实发现是使用了 ReentrantLock 互斥锁 以及 Condition 的等待唤醒功能。
Q: CyclicBarrier 的实现原理是什么?
A: 内部含有两个计数,分别是 parties 和 count ,初始是二者相等,当有线程调用 await() 时,count 递减,只要 count 不为 0 , 就会阻塞线程,直到 count 递减为 0 时,此时会所有线程一起释放,同时将 count 重置为 parties。
Q: CyclicBarrier 是如何实现回环的?
A: 使用两个计数,count 递减,当 count 为 0 时,会重置为 parties,从而达到回环效果。
Q: 为什么 count 的 –count 操作没有使用 CAS?
A: 因为已经 lock.lock() 了,使用了 ReentrantLock 锁能够保证 count 的原子性。
CyclicBarrier 和 CountDownLatch 的区别
- 回环:CyclicBarrier 可以回环,重新计数。CountDownLatch 只能一轮。
- 计数器:CyclicBarrier 的计数器自己维护递减, CountDownLatch 的计数器维护则是交给使用者。
- 阻塞线程:CyclicBarrier 阻塞的是自身,当到达屏障后,所有被阻塞的线程一起释放。CountDownLatch 可以指定阻塞线程。
结束语
本文主要介绍了 CyclicBarrier 的常用方式,通过源码方式,分析如何达到屏障以及回环的效果。不对之处,请多指正。